
How to: DIY Travel Makeup Brush Bag
This post may contain affiliate links, which means I may receive a small commission, at no cost to you, if you make a purchase.
Get ready to get crafty, beauty junkies!
 photos: Katie G for we heart this
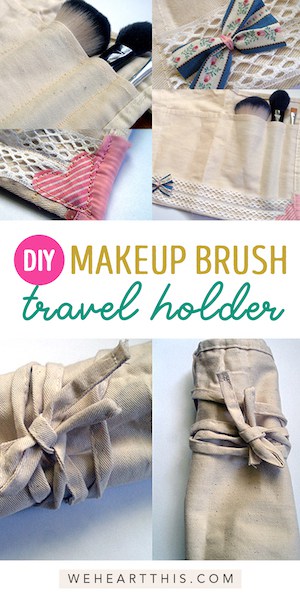
Our DIY expert, Katie G has really outdone herself with this adorable, affordable, and totally do-able project for even novice crafters. All you need is some basic sewing skills (or a helpful friend that can sew a straight line.) How can you resist trying our latest How to: Create a customizable makeup brush travel bag ~ wht
This may be the easiest, most satisfying DIY ever! There are so many ways to customize this basic idea to your liking. And who doesn’t want a cheap, roll-up travel bag? Especially if you already have a nice one – this can be your back up for less luxurious trips like camping (Yes, I bring my makeup on camping trips – don’t act like you haven’t done that before!) Or just to toss in your daily tote bag.
Supplies:
 • Canvas work belt (I got mine for $1 in the hardware area of Wal-Mart)
• Sewing machine or go with the classic thread and needle.
• Embellishments to customize your project (bits of fabric, lace, ribbon – whatever you have squirreled away)
• Buttons or other closure items (optional)
Step 1:
 Use your brushes to measure how far apart you want your seams. This is the best part! Every pouch will be exactly the size needed for each brush.
Place your brushes (in the order you prefer) in the large pouches and then mark your stitching lines with pencil or chalk. (I was lazy and just eyeballed where to stitch.).
Stitch straight down your lines.
Step 2:
Now, the is the fun part! Embellish the inside of your bag however you’d like.

I used vintage lace and cut a heart and bow from vintage ribbon. You could embellish the outside too, as long as you secure any hanging embellishments that might get knocked off in your suitcase (beads, tassels, etc).
Step 3:
 I don’t have enough brushes to fill the entire bag, so I left some of the large pouches for random necessities. One pouch fits my little jewelry bag and the other fits ALL of my makeup essentials (Of course, I’m a minimalist when it comes to makeup).
These larger pouches will need some type of closure to secure your items. Your options include a button or two, some snaps or magnets or even velcro. I used a vintage pin to close mine.
And here it is – the finished product! I’m so happy with it.

Finally, here’s a look at my new makeup brush travel bag all rolled up.

Tips & Extras:
•• To make this look even cooler, you can dye the entire bag before you begin sewing. I wish I thought of this earlier! (I was totally thinking of iDye before I read this tip! ~T)
•• If you are feeling extra crafty, you can remove and restitch the strings to the middle of one side of the bag. This way the roll-up will be perfect. As is, with the strings up top, the roll-up is a bit wonky (but not too bad to use!)
•• Remove the strings and replace with jute twine or ribbon for an extra touch.
I think these make great gifts, especially for all the people in your life; the crafty person, a painter, makeup fiends, the student (school supply pouch), kids (crayons), etc. Even better how about making these as a project for a girl’s spa night? Or a rainy day art project with the kids? Share your ideas below!
Any questions? Ask me in the comments. I hope you enjoy this How to and your new bag!
=D This is awesome! Great alternative to buying $30+ rolls haha
It’s also great for gifts =) Very awesome!
@katieg, this is so much nicer than the store-bought pleather makeup brush roll I’m using now. That little ribbon heart is the most precious thing I’ve ever seen! Thank you for sharing your crafty magic with us. I’m going to give this one a try!
@katieg this looks super easy and cute! Thanks for sharing.
I’ll have to ask my aunt to do the sewing though, I can’t even make a straight line with a ruler!
I shared this project on my site because it is such a cute, frugal project. Thanks for sharing! I love it.
If only I had a sewing machine!!! But honestly @katieg, you should make these cute makeup brush bags and sell them! I would buy one for sure!
Aww, I’m glad you guys like it!
AHH! This is brilliant! I made one of these for a friend, but I did it from scrtach, this is SO much better! And it looks TONS better, how adorable is that heart? I need to make this…just as soon as I finish all my other sewing projects. :-)
I know what I’m making all my girlfriends for Christmas this year. And my husband thought I wouldn’t use the sewing machine I insisted on bringing with when we moved!
I would love to do this one! Thanks
http://glossboudoir.blogspot.com
hello adorableness! well done @katieg :)
@katieg– I love this idea! You are so creative- I would have never thought of this in a Million years. This was an excellent post.
@irene — You are right Katie should sell these.
This is beautiful! I don’t travel enough for a makeup bag though. I pack things that don’t require brushes (or maybe one brush) when I have to go somewhere.
OK, now you guys have given me another project to add to my list. This is so adorable!
What a great DIY for the wht beauty lovers! Thanks @katieg for this awesome tutorial. I want to make one and I have so many little bits of fabric and ribbon (and a 70’s era Flyers patch I always wanted to use) to customize it.
Love the idea of having a crafting party with girlfriends of the kids – fun and useful!
@sillylilacs – so true! I’ve looked at brush roll up travelers before but they start at $20 and nice ones are much, much more.
Thanks for stopping by Barbara and for sharing this How To with your readers – love your site!
@katieg I just love this project. You are just so cute,talented, and creative. You have inspired me to give some sewing a try. I am always looking for great new brush storage.
So cute!
This is a great idea. Makes me wish I was handy with sewing machine.
she is brilliant ….
how cute is this! love it. i have to make one for myself
This is uber creative. I’ve never thought of this but totally need to get to it. This is perfect, especially for when I’m at fashion shows and photo shoots.
Easy but still very pretty idea!
I love to try this one, especially that it saves some money, of which I can use to buy some extra makeup products!
Thanks for sharing!