What Is Hard Gel? Discover the Secret to Long-Lasting Nails
This post may contain affiliate links, which means I may receive a small commission, at no cost to you, if you make a purchase.
Find yourself asking “What is hard gel?” If you’ve ever been frustrated by chipped or broken nails, hard gel might solve your nail care woes.
Don’t worry; you’re not alone. This nail enhancement has recently gained popularity for its durability and strength. But what is it, really? And what makes it better than other nail enhancements?

Read on to know the answers to these questions and learn more about the unique properties of hard gel!
Fast Facts
- Hard gel is a durable and long-lasting nail enhancement.
- It is ideal for nail extensions and overlays.
- Proper care and maintenance are essential for optimal results.
Table of Contents
- 1 The Basics of Hard Gel
- 2 Advantages of Hard Gel Nails
- 3 Disadvantages of Hard Gel Nails
- 4 Hard Gel vs. Other Nail Options
- 5 How To Apply Hard Gel
- 6 Maintenance and Care of Hard Gel Nails
- 7 How To Remove Hard Gel
- 8 Creative and Artistic Uses of Hard Gel in Nail Art
- 9 Frequently Asked Questions
- 10 It’s High Time You Give Hard Gel Nails a Try!
The Basics of Hard Gel
What is hard gel used for? Hard gel is used as a nail enhancement.
Unlike regular gel polish, hard gel can’t be soaked off with acetone, so it offers a more resilient, long-lasting finish that resists chipping and breaking.
Ideal for nail extensions and overlays, hard gel has become a go-to choice for those who need extra reinforcement on their natural nails.
Here is a breakdown of the basic information you need to know about hard gel:
Composition
“What is hard gel made of?” you might ask.
Well, hard gel for nails is made of monomers, such as ethyl methacrylate (EMA) or urethane methacrylate, along with other ingredients that allow for workability, adhesion, and hardening.

The monomers are primarily the building blocks that polymerize and create a solid structure when exposed to UV or LED light.
Also, hard gels include more cross-linking agents than soft gels. These help form a strong and rigid network of polymer chains and contribute to the hardness and durability of the cured gel.
Understanding the Polymerization Process
When hard gel is applied to your nails, it undergoes a process called polymerization.
This chemical reaction causes the monomers in the gel to form long chains, creating a solid product that provides strength and durability to your nails.
The Role of UV or LED Light in Curing Hard Gel
Curing or hardening the gel during a hard gel manicure or extension is done using a UV or LED light.
The light serves as the catalyst for the polymerization process. When hard gel is exposed to the UV or LED light, it sets quickly and becomes strong and resistant to chipping.
Removal
Unlike soft gels, hard gel cannot be soaked off and must be filed off when it’s time to remove the nail enhancement.
This characteristic makes hard gel a great choice for those seeking long-lasting nail treatments, such as overlays or extensions.
Advantages of Hard Gel Nails
So what makes hard gel nails a good option for you?

Here’s a rundown of the benefits this nail enhancement can give you:
Durability and Strength
Hard gel nails are known for their durability and strength, making them a fantastic option if you’re looking for a long-lasting manicure.
They can last several weeks without chipping or cracking, which means you can enjoy beautiful nails for a more extended period compared to other nail treatments.
Hard gel nails are also generally more solvent-resistant compared to other types of nail enhancements.
Natural Appearance and Flexibility
One of the significant benefits of hard gel nails is their natural-looking appearance and flexibility.
Despite its durability, hard gel is still a lightweight and flexible material, giving your nails a natural feel while still providing the desired strength.
Being lightweight means that they won’t feel uncomfortable on your fingers, making them a great choice if you’re looking for a pleasant and easy-to-wear option.
Additionally, the flexibility of hard gel nails allows them to bend with your natural nails, reducing the risk of damage or breakage.
Customizability With Nail Art and Design
Hard gel nails are incredibly versatile when it comes to nail art and design. You can create various shapes and lengths, from almond to coffin and square, to achieve your desired look.
The hard gel’s consistency makes it easy to work with and apply, allowing you to create stunning and intricate nail art designs.
With hard gel nails, you can express your personal style and creativity while enjoying a durable and long-lasting manicure.
Disadvantages of Hard Gel Nails
Indeed, hard gel has its advantages. But of course, it does not come without its cons:

Allergies and Skin Reactions
While hard gel nails are generally safe, some may experience allergies or skin reactions.
The chemicals used in the process may cause irritation, itching, or redness around the nail area for those with sensitive skin.
It’s essential to patch-test a small area of the skin to ensure you don’t have an adverse reaction before committing to a full hard gel manicure.
Costs and Time Commitment
Hard gel nails can be more expensive than other nail enhancements, both in terms of initial application and regular maintenance.
You’ll need to allocate funds for salon appointments, requiring an ongoing financial commitment.
Similarly, the time investment can be significant as application, maintenance, and removal appointments can take longer than traditional nail services.
Risk of Damage if Not Applied or Removed Correctly
Improper application and removal of hard gel nails can lead to potential nail damage. The hard gel may not adhere properly if not applied correctly, leading to lifting or breakage.
Likewise, the natural nail beneath can experience damage or weakening if hard gel is not removed gently or professionally.
Quick Tip
To minimize these risks, always visit a reputable salon with trained technicians for your hard gel services.
Hard Gel vs. Other Nail Options
Now that you know what hard gel manicure is and its pros and cons, you might be curious how it compares to other popular nail enhancements.
Don’t worry, we got you!
Here’s a table to make it easier for you to tell the difference between hard gel and other popular nail enhancements:
| Nail Enhancement | Consistency | Removal | Curing Method | Odor | Ideal For |
|---|---|---|---|---|---|
| Hard gel | Liquid; strong and durable | Requires filing | UV or LED light | Low odor | Building length professionally |
| Soft gel | Liquid; thin and pliable | Soaked off like gel polish | UV or LED light | Typically low odor | Everyday use, beginners |
| PolyGel | Liquid; softer, putty-like consistency | Can be soaked off | UV or LED light | Low odor | Home manicures, beginners |
| Acrylic nails | Mixture of monomer and powder | Requires filing | Cured by air | Strong odor | Experienced users, professionals |
And here’s a detailed comparison:
Hard Gel vs. Soft Gel
Soft gel polish is your typical gel polish. It is a thinner, more pliable substance applied to nails to provide color and shine.
A soft gel can also act as a nail extension but only up to an extent.

Hard gel, on the other hand, is a stronger, more durable product used to create extreme length and shape.
While they’re both cured under UV or LED light, hard gel cannot be soaked off like gel polish and must be filed off carefully to prevent damage to the natural nail.
Hard Gel vs. PolyGel
PolyGel is another nail enhancement option that has a thicker consistency than hard gel, which makes it easier to sculpt and build out nails.
PolyGel application resembles acrylic nail application in that it involves dipping your brush into a liquid solution. However, unlike acrylics, PolyGel needs to be cured under a UV or LED lamp, just like hard gel.
PolyGel is particularly popular for home manicures and beginners because it’s easy to use.
The flexibility of PolyGel may be a preference for some, but others may prefer the firmer feel of hard gel.
Hard Gel vs. Acrylic Nails
Both hard gel and acrylic nails can be used to create extensions and various nail shapes. The principal difference lies in their composition and application.
Acrylic nails involve a liquid monomer and a powder polymer being mixed to form a paste sculpted onto the nails.
Hard gel is applied directly to the nail and must be cured under a UV or LED light.
Unlike acrylics, hard gel doesn’t emit a strong odor during application, which can be a significant advantage for some people.
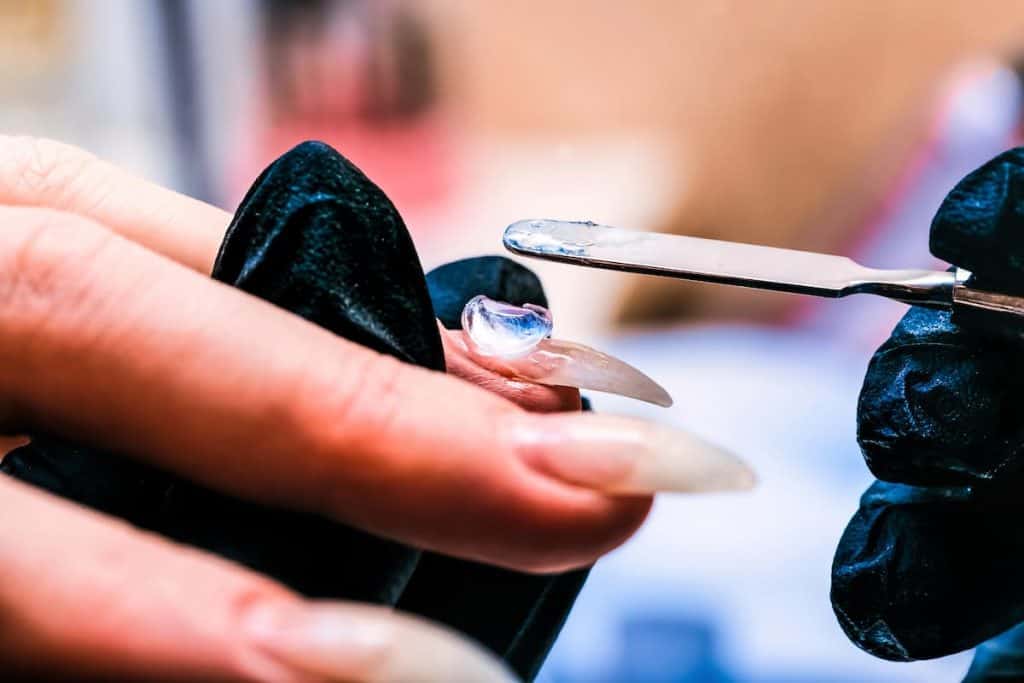
How To Apply Hard Gel
If you’re all set to give hard gel a try, here’s an easy guide you can follow:
What You’ll Need
- UV lamp
- Hard gel
- Nail file
- Nail forms
- Buffer
- Nail cleanser
- Primer
- Base coat
- Top coat
- Cuticle pusher
- Nail polish remover
- Nail brush
- Lint-free wipes
Step-by-Step Instructions
- Prepare your nails. Start by removing any existing nail polish with acetone, and make sure your nails are clean and dry.
Push back your cuticles and gently buff the nail surface to create a smooth base for the hard gel application.
- Choose the correct form. If you opt for gel extensions, select the right size and shape of nail forms to fit your natural nails.
These will help guide the process and ensure a clean, even hard gel application.
- Apply the base coat. Apply an even, thin layer of base coat gel polish to your nails, being careful not to let it pool around your cuticles.
Cure the base coat under an LED or UV lamp according to the manufacturer’s instructions.

- Apply the hard gel. Using a separate brush, apply a thin layer of the hard gel to your nails, including any nail forms or nail tips for extensions.
Be sure to extend the hard gel beyond the natural nail edge if creating extensions. Cure this layer under your LED or UV lamp.
- Build the nail. If needed, apply additional layers of hard gel to build up the nail’s thickness and shape, curing under the lamp after each application.
Continue until you’ve achieved your desired length and shape.
- File and shape. Once the hard gel is cured and strong, you can now file and shape the nails.
Use a fine grit file to smooth rough edges and create your desired nail shape, such as almond, coffin, or square.
- Apply a top coat. Finish with a clear gel top coat, curing it under the lamp according to instructions. This step seals the hard gel, creating a shiny and protective finish.
- Clean up. Finally, use acetone or a gel cleanser to remove any sticky residue left on your nails, and enjoy your new hard gel manicure or extensions!
Here’s a great tutorial video that shows these steps in action:
Tips for Creating the Best Hard Gel Manicure Application
Here are some valuable tips that will elevate your hard gel experience:
- Make sure your work area is clean, well-lit, and free of distractions. It’s important to have a clean and organized work area when doing your nails. This environment will help prevent any accidents or mistakes while you are working.
Make sure you have enough space to work comfortably and that the lighting is good so you can see what you are doing.
- Don’t skip prep. Not properly cleaning and buffing the nail surface can lead to hard gel lifting and chipping.
Make sure to clean your nails thoroughly, push back your cuticles, and buff the surface to remove any oils or debris before applying the gel.
- Use high-quality, compatible products recommended by your chosen gel system. Using high-quality products is essential for achieving long-lasting and durable gel nails.
It’s crucial to use products compatible with the gel system you have chosen to ensure they work well together. Using low-quality or incompatible products can cause issues with the gel nails’ adhesion, durability, and longevity.

- Don’t use too much product. Applying the gel too thick can cause uneven curing and an unattractive final result. It can also cause the gel to lift or crack over time.
Apply thin, even gel layers and cure each layer properly before applying the next layer. This step will ensure that the gel cures evenly and lasts longer.
- Clean your brushes properly between uses to prevent the gel from hardening them. Cleaning your brushes properly between uses is important to prevent the gel from hardening on them.
Hardened gel on your brushes can make them unusable and affect the quality of your work.
Make sure to clean your brushes with a brush cleaner or alcohol after each use and store them properly to prevent them from getting damaged.
- Always cure according to the manufacturer’s instructions. Proper curing is essential for achieving long-lasting and durable gel nails.
Over-curing can cause the gel to become brittle and crack, while under-curing can cause the gel to lift or peel off the nails.

- Avoid touching your nails with your fingers during the process. Oils from your fingers can interfere with the adhesion of the gel to your nails.
It’s important to avoid touching your nails with your fingers during the application process.
If you accidentally touch your nails, use a clean brush or cotton swab to remove any oils before applying the gel. Doing so will help ensure the gel sticks well to your nails and lasts longer.
- Refrain from filing your nails too much. Over-filing your nails can weaken their structure and cause the hard gel to crack or lift over time.
Filing your nails to your desired shape and length is important, but avoid over-filing. Use a gentle touch and a fine-grit file to prevent damaging your nails.
Maintenance and Care of Hard Gel Nails
Keeping your hard gel nails looking their best requires some care and attention.
In this section, we’ll go over how to maintain your hard gel nails, as well as some tips for prolonging their lifespan and preventing damage.
Tips for Maintaining Hard Gel Nails
To keep your hard gel nails in top shape, follow these simple steps:
- File your nails. Regularly file your nails to maintain their desired length and shape.
- Keep them clean. Wash your hands regularly and ensure that dirt and oils don’t accumulate under and around your nails.
Doing so will not only keep your nails looking good but also promote general nail health.
- Avoid harsh chemicals. Exposure to harsh chemicals in cleaning products and nail polish remover can weaken hard gel nails.
To protect them, wear gloves when doing household chores.
- Moisturize. Hard gel nails can sometimes cause your natural nails to become dry.
Apply cuticle oil and hand cream regularly to keep your nails and the surrounding skin hydrated and healthy.

Tips for Longevity and Damage Prevention
Here are some tips to help your hard gel nails last longer and prevent any potential damage:
- Choose the right nail technician. If you choose to have your nails done for you, ensure that a professional and reputable nail technician applies your hard gel nails.
This step will help you avoid incorrect application that leads to weakened nails and other issues.
- Be gentle. Although hard gel nails are durable, they’re not indestructible.
Avoid using your nails as tools, and be gentle with them during daily activities to prevent breaks, chips, or cracks.
- Schedule regular touch-ups. Depending on your nail growth, hard gel nails must be filled every two to three weeks.
Scheduling regular touch-ups will help maintain your nails’ appearance and prevent lifting.
By following these maintenance and care tips, you can enjoy your hard gel nails for as long as possible and keep them looking fabulous.
How To Remove Hard Gel
Hard gel nails are popular for those looking for a durable and long-lasting manicure. While they’re known for their strength and flexibility, removing them at home can be tricky.
Hard gel is non-porous, unlike regular gel polish or acrylics, so it can’t absorb chemicals like acetone. For this reason, hard gel is stain-resistant and more challenging to remove.

To help you with this process, here’s a friendly guide on how to remove hard gel nails properly and safely:
What You’ll Need
- Nail file
- Cuticle pusher
- Buffer
- Lint-free wipes
- Acetone
Step-by-Step Instructions
- File: Begin by filing down the surface of the hard gel nails to remove most of the product.
Be gentle and patient during this process to avoid causing too much stress on your nails and fingers. Keep filing until you reach a thin layer of hard gel remaining on your nails.
- Soak: Apply a generous amount of acetone onto a cotton pad, place it over your nail, and wrap it in foil to keep it in place.
Ensure that the acetone-soaked cotton pad is in direct contact with the hard gel surface. Repeat this process for all your nails.
Allow the acetone-soaked cotton pads and foil wraps to stay on your nails for roughly 10 to 15 minutes. This wait time will allow the remaining hard gel to soften.

- Scrape: After removing the foil wraps, use a cuticle pusher to gently scrape off the softened hard gel.
If you encounter any stubborn spots, be patient and use the pusher with minimal pressure to avoid damaging your natural nails.
- Buff: Use a buffer to smooth any rough edges left behind.
Remember always to prioritize the safety and well-being of your nails and fingers during removal.
As you can notice, this process is more complicated than regular DIY procedures. If you think you can’t do it properly, have them professionally taken off to avoid damaging your natural nails.
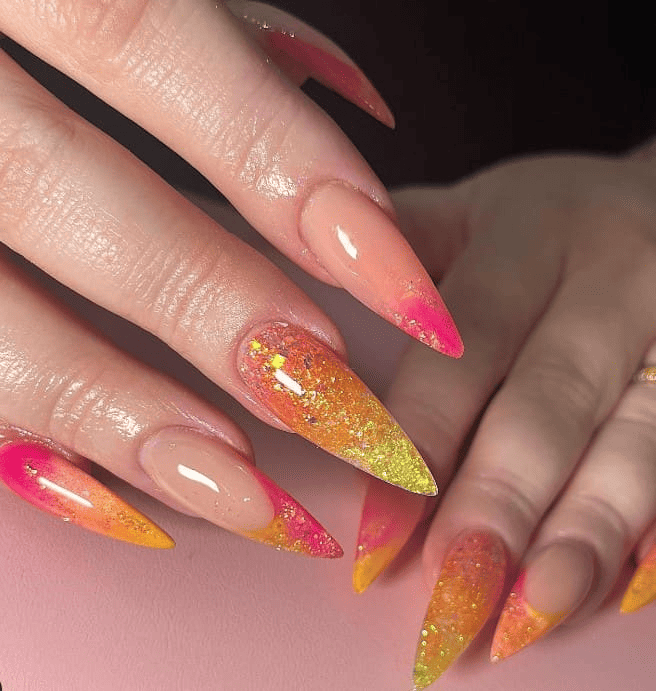
Creative and Artistic Uses of Hard Gel in Nail Art
Hard gel has opened up a world of possibilities for creative and artistic nail designs.
From intricate 3D nail art to stunning color overlays, there’s no limit to what you can achieve with hard gel. Here are trendy suggestions:
- 3D nail art: Create eye-catching designs using hard gel to sculpt and mold 3D elements onto the nail surface.
- Marbling: Achieve a marbled effect by swirling different colors of hard gel together before curing.
- Ombré nails: Create a gradual color transition by blending two or more colors of hard gel, creating a seamless blend from one shade to another.
Nail technicians and artists are experimenting with different techniques, such as marbling, ombré, and intricate hand-painted designs — all made possible with hard gel’s flexibility and strength.

Frequently Asked Questions
Are Hard Gel Nails Damaging for Natural Nails?
While no nail enhancement is entirely risk-free, hard gel nails are generally safe for natural nails when applied and removed correctly by a trained and experienced technician.
Proper care and maintenance can help minimize damage to your natural nails.
Always follow your nail technician’s advice on aftercare, avoid picking or peeling off your hard gel nails, and schedule regular appointments for fill-ins or proper removal to keep your natural nails healthy.
Can I Paint Over Hard Gel Nails?
Yes, you can paint over hard gel nails with regular nail polish or gel polish. It’s important to wait until the hard gel is fully cured and apply a base coat to prevent staining.
After applying your desired color, finish with a top coat and cure under a UV lamp.

It’s High Time You Give Hard Gel Nails a Try!
If you’re someone who wants a manicure that can last for weeks without chipping or lifting, then hard gel may be worth trying. It’s also a good option for those with weak or brittle nails who want to add strength and durability.
Additionally, hard gel can be customized with various colors, designs, and nail art, making it a versatile option for any occasion.
So why not give hard gel a try and see for yourself? With proper care and maintenance, it can provide a long-lasting and beautiful manicure that you’ll love.
Want Design Inspiration for Your Hard Gel Nails?
Check these out:
- 40 Head-Turning Glitter Nail Designs
- 40+ Sizzling Summer Ombré Nails To Try
- 53 Y2K Nails That Bring Back the Spacey, Blingy Era