
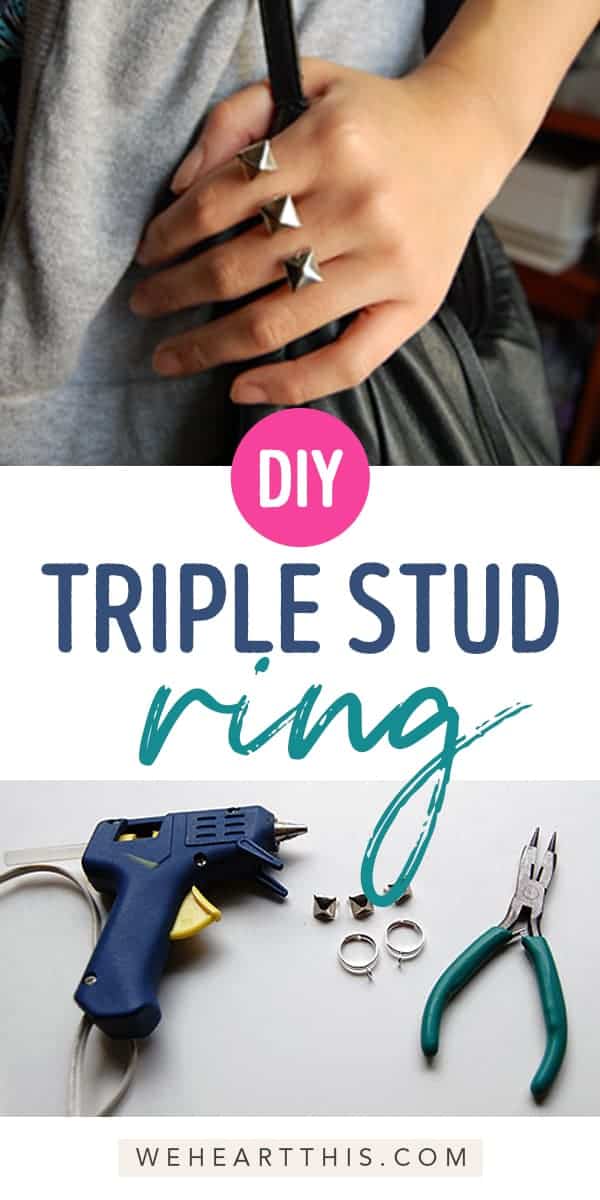
DIY: Triple Stud Ring – a little tough, a little sweet, a lot cool
This post may contain affiliate links, which means I may receive a small commission, at no cost to you, if you make a purchase.
 We’re so excited to continue to add to our amazing crew of writers at we heart this. Today, we want to give a big welcome to Kirsten, who will be sharing her crafty ways with the lucky wht readers every month.
A fan of vintage everything (but especially shoes) with a love of art, music, beauty, fashion, she’s a wht chick after our own hearts! And make sure to check Kirsten’s blog, Studs and Pearls for tons of inspirational photographs, musical fun and loads more tutorials.
~ wht
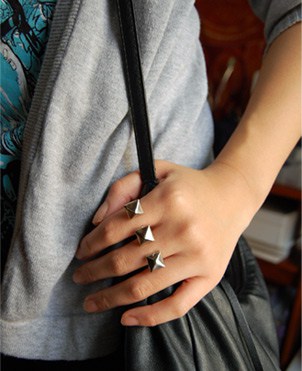
As many of you creative ladies know, studs and multi-finger rings are some of the most well loved fashion trends right now. Double and triple finger rings are such significant statement pieces, and can really bring an outfit to an entirely new level. I personally love both studs and multi-finger rings – so why not combine the two?
My love of studs and my love of jewelry making crossed paths (along with inspiration from high end, designer multi-finger rings) – and the triple stud ring was born. It’s SUPER easy to do, even for beginner jewelry makers.
DIY Punk Triple Stud Ring
 all photos: kirsten for we heart this
Supplies:
• Glue gun (or an industrial strength glue such as E6000)
• 3 pyramid studs
• Jewelry pliers
• 2 adjustable rings**

** Any kind of adjustable ring blank will do. You can usually find them with loops (as I did) or with flat metal pads. But you just need the ring – so if your rings have loops, simply twist them off with the pliers. If they have pads, you can also just take them off with pliers.
A quick glue note: If you use a glue gun, you must work quickly, as hot glue dries fast. If you’d like a more solid foundation for your ring, I’d recommend using a glue like E6000. I suggest working quickly with this as well – and in a well-ventilated area! You’ll also need about 24 hours for your ring to completely dry. Your ring will be much stronger if you use E6000, but again, it’s up to you.
Instructions:
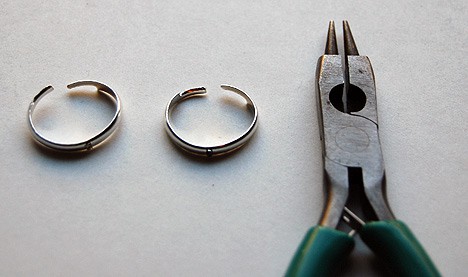
1) These were my rings after I twisted off the loops. Slightly open up the rings…
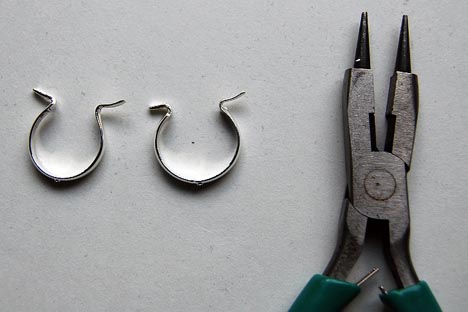
2) …then, using your pliers, bend each end of the ring outwards. Try to make sure the bended end is as horizontal as possible.
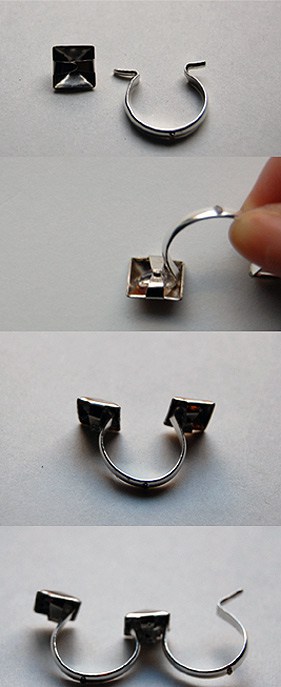 3) Take one of the studs and bend each of the 2 prongs in. Fill the inside of the stud with glue.
4) Insert one of the rings into the glue/stud.
5) Fill in the second stud with glue and place it on the other side of the ring.
6) Add a little more glue and slide in the second ring…
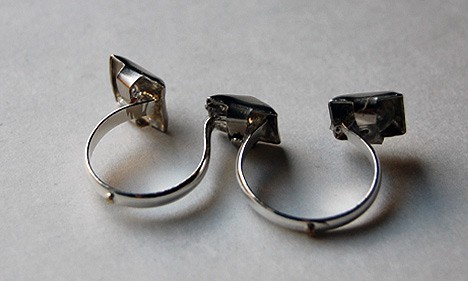
7) Then glue the last pyramid stud to the last side of the ring.

8) AND…you’re done!
A few options:
* Try using pyramid studs in other colors; gold, black, brass, or maybe even a mix?
* You can also use different colored rings, as well.
* Shaped studs (cones, stars, etc) would be an awesome variation for this ring.
we heartsters, please give Kirsten a warm welcome and let us know what you think of this tutorial! Are you ready to make your own Triple Stud Ring for yourself or maybe for a stocking stuffer this season?
Kirsten of Studs and Pearls is currently in graduate school, working towards her Masters of Science in Nutrition. She loves vintage shoes, photography, and baking at obscure hours of the night. Her art and DIY supplies are currently taking over her apartment, and she wouldn’t want it any other way.
Holy crap, this is SO COOL! I’m a little punk at heart, and studs just kinda do it for me. I think a trip to the craft store is in order. Thanks for giving me a good reason to break my glue gun out of hibernation, @kirstengail !
I love this tutorial! I’m a HUGE fan of DIY and will be looking forward to your posts, @kirstengail!
And can I just second the E6000 recommendation? As the second in command to many a drag queen’s projects, that stuff will bond jewelry, rhinestones, broken heels, cracked compacts…dang near everything!
Welcome @kirstengail! We are so lucky to have you.
Love this, I’d so rock this ring. Total upscale punk rock.
And E6000, how have I never heard about this? Sounds serious!
Fierce! I love the studs. This ring style made a huge comeback too…even Ms. Rhianna sports this style. This DIY version is very very cool. Thanks @kirstengail!
Your instructions make this project seem so easy, @kirstengail! Thanks for sharing your secrets!
I’m so excited to be a part of the WHT team :)!
Amanda/@mandaleem – I totally agree with you, I’m the same way! I love that the studs are subtle but still fun.
Alyssa/@lyssachelle – Yes, E6000 is craaazy…It’ll hold up 10000x better than a hot glue gun. After a few times of wearing this ring I found it to be a bit delicate/brittle, with the hot glue, so that’s an important factor to keep in mind, girls! But again, its up to you. Hot glue is just one of many options :)
@stef – E6000 is extremely serious, haha. It will hold anything & everything together. I know some people don’t like using it which is why I suggested using either hot glue or E6000. The fumes can cause quite the headache, so a well-ventilated work space is definitely needed.
@mandabear – I love these types of rings. Glad you enjoyed it!
Melissa/@turboterp – it really is super easy!
Welcome and Wow @kirstengail! I’m so impressed! You are good at teaching us how to do this- My Mom was good with the old fashion glue gun at the flower shop..and that was all I ever used one for.. Pretty handy for small jobs. This one you use is really amazing- the super duper E6000! I’m prone to headaches, so good suggestion to be in a well-ventilated work space.. I know I can do this now thanks to you!
All I can hear in my head as I read these comments is “The E6000 needs to cool down!” ala PeeWee in PeeWee’s Big Adventure – heh. This glue sounds like serious stuff!
And I am totally with Amanda/@mandaleem – Holy Crap what an awesome tutorial! I love that this is a crafty post making something decidedly Not Cute. (Not that there’s anything wrong with cute). Love the subtle punk/rock vibe of this ring. And while I love big chunky rings, I have little hands and look silly wearing them. This I can totally pull off.
Welcome @kirstengail to the wht crew. We are so happy to have you here and I can’t wait to see what you have for us in the future!
Congrats Kirsten! Love the tutorial. I still have to take pictures of that bracelet you taught me how to make (via internet)! =)
Love this Kirsten. I’ve never tried to make my own jewelry, but this looks super easy. Great tutorial!
Great tutorial! Make sure the metal is flush with the ring or stud though. If you find the metal isn’t flush after you’ve twisted off the tabs/loops, you MUST FILE THEM DOWN with a file and/or sandpaper meant for metal; alternatively, you might need to take off the stud and the glue and try again. The stray metal WILL scrap your fingers and/or your hands raw; worse, it could cut them really badly.
Trust me on this one!
P.S. Another great material for holding metal together is Krazy Glue. The stuff is INSANE. If you don’t want to use hot glue, try Krazy Glue.
Abby, Hi! Thanks girl, I miss you!! and I can’t wait to see the bracelet you made.
@Tiffany, Thanks! Glad you liked it.
@Irene, Yes, definitely work in a well-ventilated area, fans and windows open, or even outside if you must. That stuff’s strong. And I’m glad you enjoyed the tutorial!
@Tyna, I know what you mean about crafts not being so cutesy…non-cutesy crafts are a nice change once in a while. And I’m really happy to be a part of the WHT crew :)
@Katie, good tips, thank you!
@kirstingail, I’m so excited that you’re writing for wht! This is a great, on trend, and easy craft you’ve come up with. :)
Oh this is so cool! I may need to make one for myself!
Fantastic! What a great blog too :) x
woah i was going to buy one of these. im gonna try and make it now !
Kristen is amazing!
I love the ring, can’t wait to make it. Thank you very much :)
nice one! I love the end result! x
I love this so much! I am definitely trying this myself, I’m such a ring fiend.
OMG!!!! amazing!!! great idea!!!! loooooovee itttt!!!!
http://www.fepadesign.com
Wow this is such a cool idea! I’m totally going to try this <3 I love inventive jewelry & Accessories … http://su.pr/2xd3nc SO Adorable!❤
Yay! I love rings now this is a cool and awesome way to make my own fancy rings!
I love this idea. I first saw a ring like this ten years ago and just was able to finally find one! Iw I’m looking forward to making my own!!! Thanks for the great tutorial! :)
Great Blog and fantastic post nice ideas!
So cool! Thanks for sharing!
Wow! What an original look!
Such a clever idea, I’m going to try that when I get home :) x
Love this tutorial *_*
Thank you sooo much ^_^
A loser like me
GIVEAWAY
GENIUS!!!!!
This looks cool! I’m out for inspiration for a “Heavy metal party” in a while. This looks easy and authentic enough :-)