
DIY: Customized Glitter Nail Polish
This post may contain affiliate links, which means I may receive a small commission, at no cost to you, if you make a purchase.
Save some money on your beauty budget with this How To
 photos: kirsten for we heart this
This project is a little different than my usual. It leans more towards the beauty related side, which I’m sure the we heart this readers will not complain about! Something tells me most of you have a soft spot for glitter nail polishes – not only are they fun, but they are SO pretty!
With this project, you can create your own glitter polish. All you need for this DIY is some craft glitter and clear nail polish. This is a great project for those that don’t have the crafting gene – it’s so basic anyone can do it.

Supplies:
• Your nails…already painted!
• Clear nail polish
• Thin paintbrush
• Water bottle cap
• Glitter(s) of your choice

Glitter is available in an endless variety of colors, shapes, and sizes. For the purpose of this project, you might want to stay away from ultra fine glitter and choose something a bit chunkier – but not too chunky!
Your standard glitter will work perfectly fine. Check out the scrapbooking or stamping section (or even the kids’ crafts section) of your local craft store for some colorful glitter options.

And if you’re wondering – the nail polish I’m wearing is Teeny Bikni by Sephora!

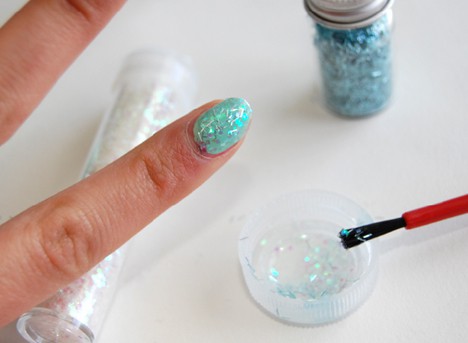
1. Pour a small amount of clear nail polish into the cap.
Tip: You’ll be throwing this out when you’re done, so don’t pour too much, too soon. Start off with a small amount and add later, if needed.

2. Carefully add a small sprinkling of glitter to your nail. Again, start off with a small amount, and add more if desired. Apply polish with the paintbrush onto your nails. Let dry.
3. If you’d like, you can even add another kind of glitter to the mix.

4. That’s it! Once you have the perfect amount of glitter, you can add an additional layer of clear gloss for extra protection.

A look at another Glitter Nail Polish experiment – this one was my favorite combination.

Now you’re ready to make your customized polish! And with all of the amazing polish colors on the market, and the row upon row of glitter choices at most craft stores – the possibilities are virtually endless.
we heartsters – What nail polish shade and glitter color(s) will you use for this DIY? Share your dream combo in the comments!
I love this!!! I’m such a nail nerd and I am always looking to jazz up my current collection so I don’t buy more polish. (Which I do anyway. I have a problem. *sigh*) The use of a water bottle cap is GENIUS, so non-committal and easy to experiment with!
I do want to point out that I’ve heard of glitter melting or changing color in nail polish (mostly from ladies who “franken” their polishes) so don’t be scared if that happens.
I agree with Alyssa–this is a great way to try lots of different glitter effects without buying tons of different polishes!
Just a side note to anyone else who has to have perfectly smooth polish and doesn’t like it when the glitter is scratchy (especially a problem with chunky glitter)–I throw on a coat of Gelous (from Sally Beauty) and then a coat of Seche Vite Quick Dry Top Coat. The Gelous adds a clear thicker layer on top of the glitter. If you can still see glitter poking out, you can add another layer of Gelous and another coat of Seche Vite.
I would do a neon or pastel with iridescent glitter – kind of like the one you used @kirstengail :) I am also tempted by opaque “glitter” that I have seen in some DIY nail polishes from around the web… It has a more confetti/sprinkle effect.
Seriously, how have I never though to create my own glittery nail polish?! Love this simple and fun DIY @kirstengail! I admit I don’t buy a lot of glitter polishes because I don’t wear them all that often – but sometime a girl’s gotta sparkle! Now I can make my own, customized shades without spending any money. Hmmm, maybe time to pull out the black and orange polishes and glitter and make a Flyers themed polish – it is the play-offs after all!
Ohh…Thanks for the tips. Your nail color is so beautiful and I will surely follow your tips. This tips will help me cut the cost I spend in my “nail art”.
I’m so glad you’ve expanded your crafty superpowers to the beauty realm now, too, @kirstengail ! This is such a fun project, and Teeny Bikini is such a pretty base color. The possibilities are endless… thanks!
Love this! Thanks for the awesome idea @kirstengail!
It’s so shiny!!!
xAnna
Fairytalefrocks.blogspot.com
I made my own glitter nail polish a couple of months ago,but I added the glitter into the clear nail polish bottle.
http://miouprincesslovespink.blogspot.com/2012/02/todays-nails-and-my-diy-glitter-nail.html
The glitter was pink and after a while the polish was a transparent pink colour too!! it’s still very pretty but I cannot use it on top of a different colour now.Next time I’m gonna do it this way! thanks for sharing! :)
http://www.miouprincesslovespink.blogspot.com