
DIY Jewelry: Twisted Pearl Brooch
This post may contain affiliate links, which means I may receive a small commission, at no cost to you, if you make a purchase.
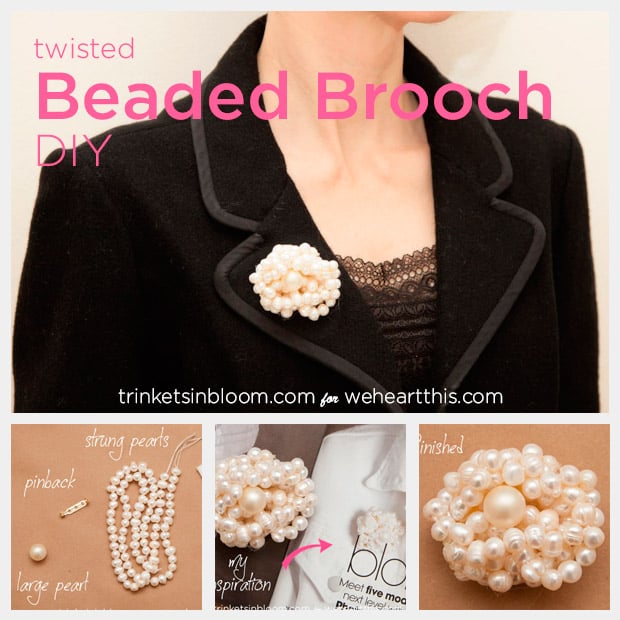
As any fashionista will tell you, it’s all about the details. This DIY jewelry project, a Twisted Pearl Brooch, will add simple yet elegant style to anything you wear.
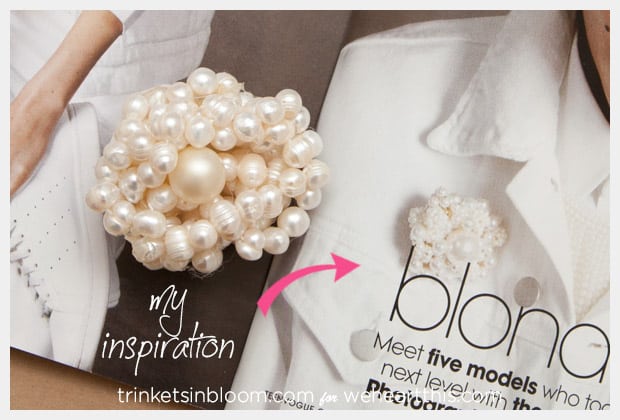
I was inspired to make this brooch after seeing this brooch in the February issue of Teen Vogue by Slow and Steady Wins the Race. Ready to make your own? let’s get started!
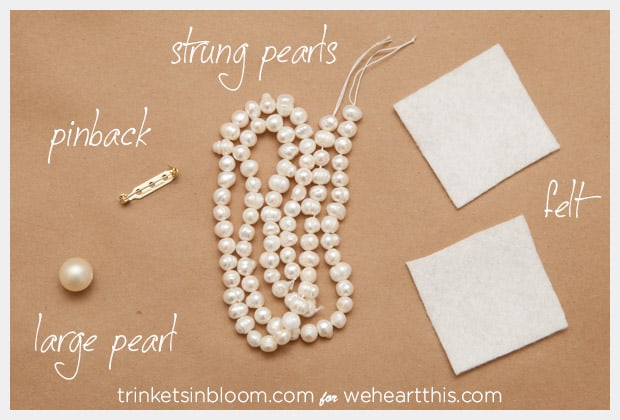
Supplies:
• Medium size pearls strung (I used 2 strings)
• 1 Large pearl
• Felt
• Pinback
• Hot glue
Directions:
1. Cut two pieces of your felt about 2 inches across.
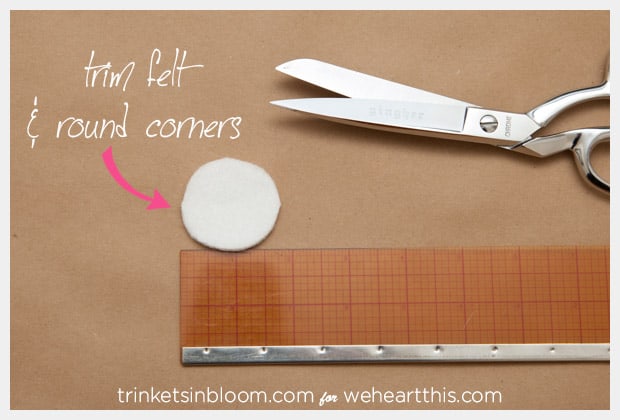
2. Trim them together and round the corners.
3. Using your hot glue, glue the felt pieces together.
4. Glue the end beads from each of your strings to the center of your felt.
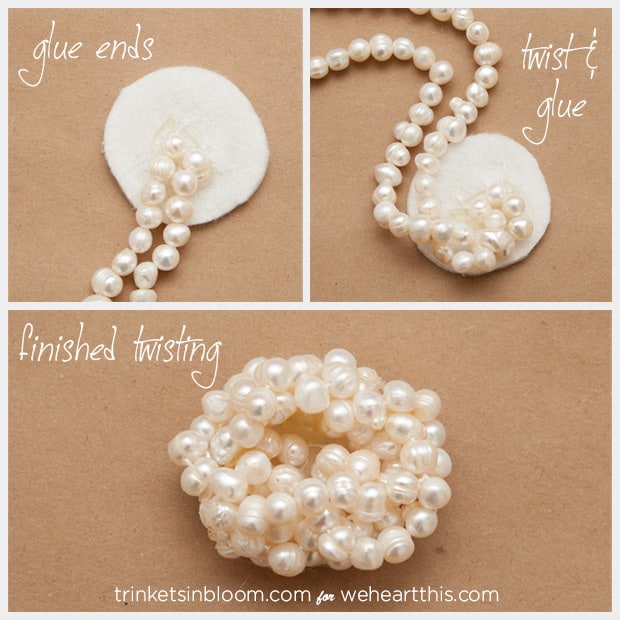
5. Start twisting your strings of beads and gluing them down to your felt. Keep doing this until you’ve covered all of your felt.
6. Glue the ends down and secure the strings.
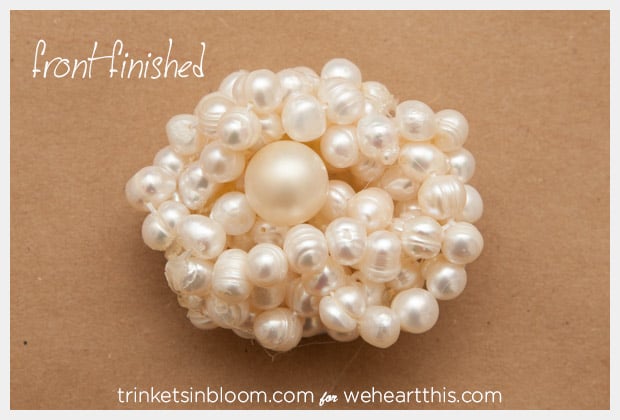
7. Glue your large pearl in the center of your strung beads.
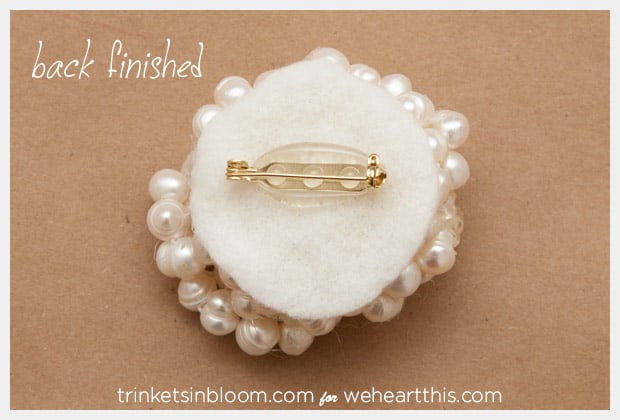
8. Glue your pinback to the back of your felt.
This brooch looks great as white on white or mix it up with lots of color! The fun organic shape keeps the pearls from being from being too stuffy and adds an unexpected twist to a edgy outfit. To see more fabulous fashion DIY’s check out my blog Trinkets in Bloom to ‘Create Your Style’!
we heartsters – Tell me about your latest DIY jewelry projects!
Very inspiring !
thanks for sharing these easy tips, I would love to try this one :)
Thank you so much! Let me know how yours turns out! :)
xoxo
Cathy
This is adorable!! AND, because I’m cheap, very affordable because strung pearls and the like are almost always on sale or inexpensive after coupon at Joann’s or Michael’s. :-) I think you’re exacting right about the organic shape; it’s classy but can still be used for casual outfits!
I’ve recently gotten into wire jewelry making; it’s a learning process and I’m pretty terrible, but it’s fun!!
Thanks Lyssachelle! It’s so true, Joann’s and Michaels almost always have beads on sale or some sort of coupon!
Keep going with the wire jewelry making! That’s awesome!
xoxo
Cathy
This brooch gives pearls such a fresh and fun twist! I’m not usually big into pearls, but I really like this–great update.
Thanks Amity! It’s always fun to mix up classic styles and give them a new twist.
xoxo
Cathy
Love this! I’ve always enjoyed the look of pearls, but never wore them a lot as they always read more “old and boring” on me than “classic and elegant.” And since I can’t pull off the super long chain draped down my back ala Jennifer Laurence, this DIY can finally get me into pearls. Yay!
And I so agree with you @Trinkets-In-Bloom this brooch would look so fabulous matched with a more edgy, rock and roll type of outfit (on maybe a jean jacket or moto jacket) – I love outfits that juxtapose styles like that!
Thank you so much Tyna! I’m so flattered that this project could turn you over to the pearl side! ;)
xoxo
Cathy
I love the look of pearls as well. I have so many strands that I am going to follow your helpful instructions and create a broach for myself. THANK YOU!
Thanks Gigi! I’m so glad this inspired you to make one! Let me know how it turns out!
xoxo
Cathy
That cluster of pearls is adorable with that black blazer!
Thank you so much Mandabear!
xoxo
Cathy
This brooch is so cute, what a great idea! I think it’s adorable and looks easy to make! I love pearls.. A classic item that never dies! I think I may pull out mine and wear to something special!
Thanks Irene! It is really easy to make and it goes with most anything, just like classic pearls!
xoxo
Cathy
Very Katherine Heburn – Love it! Thanks for sharing @trinkets-in-bloom