
Lip Blush Healing Process: Everything You Need to Know
This post may contain affiliate links, which means I may receive a small commission, at no cost to you, if you make a purchase.
If you’re ready to get a lip blush procedure, you should also be prepared for the healing and aftercare that go along with it.
The procedure and the healing period are two crucial parts of this treatment, and you are the most involved in the latter.

While you must sacrifice some things, you can quickly get on top of your lip healing routine and get the best results out of your lip blush procedure.
Not only will proper aftercare help you achieve the lip color and effect that you paid for, but it also helps with the discomfort that comes after the procedure.
Want to know more? Read everything you need to know about the lip blush healing process below.
Table of Contents
- 1 What Is Lip Blushing?
- 2 Lip Blush Healing Process: What You Need to Know
- 3 What to Expect After the Lip Blush Procedure
- 4 Lip Blushing Before And After Healed Photos
- 5 Do’s and Don’ts During the Lip Blush Healing Process
- 6 Frequently Asked Questions
- 7 Taking Care of Your Lip Blush After the Procedure
- 8 Authors
What Is Lip Blushing?
Lip blushing is a procedure that applies long-lasting and natural-looking pigments on your lips to achieve a “your lips but better” look.
This is done by tattooing semi-permanent pigment on your lips, akin to other permanent makeup procedures like microblading. Typically, this lasts anywhere from two to three years.
Apart from giving you the convenience of skipping lipstick in your daily routine, lip blushing also allows you to correct some flaws on your lips, including hyperpigmentation, paleness, lip symmetry, and scarring.
Lip Blush Healing Process: What You Need to Know
A crucial part of getting the lip blush procedure done is the healing aftercare you need. In fact, lip blush tattoo aftercare is just as important as the procedure to get the results you want out of the treatment.
By letting your lips heal properly after the procedure, you’re letting the ink pigment settle into the skin the way they’re supposed to.
If you don’t do this, you may end up with a lot of scabbing that removes a lot of the pigments from your lip tattoo.
During the lips’ healing process, expect discomfort and unpleasant side effects. These may include dryness, itching, and tightness around the lips. You can avoid this by moisturizing your lips with a healing balm or ointment.
As such, the importance of permanent lip color healing aftercare becomes twofold.
Not only will it help you get the pigment saturation you wanted to achieve, but you also get to minimize the discomfort during the healing stage.
What to Expect After the Lip Blush Procedure
When you get a lip blush, healing is unsurprisingly involved. You must be mindful of several things to get the best results and protect your lips from infection.
Here’s what you can expect when it comes to the healing process for lip blush day by day.
Day 1
Right after you get your lip blush procedure, you’ll find that your lips will be swollen. Mild to moderate swelling is normal and is usually expected as part of the semi-permanent makeup healing process.
It typically lasts for a day or two following the treatment.
Lip blushing is applied by tattooing, which makes tiny wounds that trigger this response.
During the procedure, your artist will use a numbing cream, but eventually, this will fade off.
When it does, expect to feel soreness and tenderness on your lips. Here’s what you can do:
- To minimize the discomfort you get from these side effects, you can apply ice packs wrapped in fresh towels on the area.
- You may also see some fluid on your lips right after the procedure. You can use clean water four to six hours after the procedure to remove the fluid from the area.
- After cleaning the fluid off your lips, make sure to apply the healing ointment that your artist prescribed or a moisturizing lip balm. Always keep your lips clean and moisturized during the healing process.
- Try to avoid eating for a few hours following the procedure. Also, make sure to drink through a straw.
After the procedure, your lips will likely not have the color you’ve picked, but don’t worry! The color you see right after the procedure will fade and soon settle into the lip color you chose as the wounds heal.
Days 2 to 3
On day 2 of the healing process, the swelling on your lips will start to subside. By day 3, you may notice that your lip color is getting darker or closer to your chosen hue.
Keep these in mind during these two days:
- During these days, you must keep up and continue cleaning your lips and applying healing ointment and moisturizing balm as instructed by your artist. Usually, you’ll have to do this at least after every meal.
- When cleaning your lips, do it with clean water or a cleanser on a cotton pad (make sure the cleanser is fragrance-free) before applying the balm or ointment.
Part of the lip blush healing process is always hydrating your lips as much as possible to avoid dryness.
Days 4 to 10 (the Peeling Stage)
When you get a lip-blushing treatment, expect your lips to peel as part of the healing process. You may find thin film flaking off your lips during this stage.
Also, during this time, lip blush scabbing is expected as the tiny wounds from the tattoo procedure start to heal.
At this point in the healing process, keep the following in mind:
- Avoid peeling off the scabs at all costs, as that can have several adverse effects. Not only will it fade the pigment, but it can also reopen the wounds, making them vulnerable to infections.
- The best thing you can do is to let the flakes peel off naturally since a new layer of skin will come through.
- Continue your routine of cleaning and applying a healing or moisturizing balm at this stage.
The peeling stage usually starts three to four days following the procedure and ends on day 10.
Meanwhile, the pigment used on your lips may take up to four weeks to finally settle into your skin’s lips and reach the hue you’ve chosen during the consultation process.
After the Healing Process
The healing process for lip blushing ends after your lips have fully peeled off and new, younger skin has taken its place. At this point, you can go back to your basic, everyday routine that you’ve done before getting the treatment.
Still, there are products to avoid and incorporate into your routine now that you have a lip blush:
- While applying makeup and skincare products is now okay, you should avoid some ingredients, such as retinol and skincare acids, as these may cause the pigments on your lips to fade away faster.
- If it’s not part of your routine yet, apply SPF to your lips to protect them from the sun.
- Book a touch-up appointment with your artist after around six weeks to maintain the pigment on your lips.
Lip Blushing Before And After Healed Photos
Here are some photos for your reference:
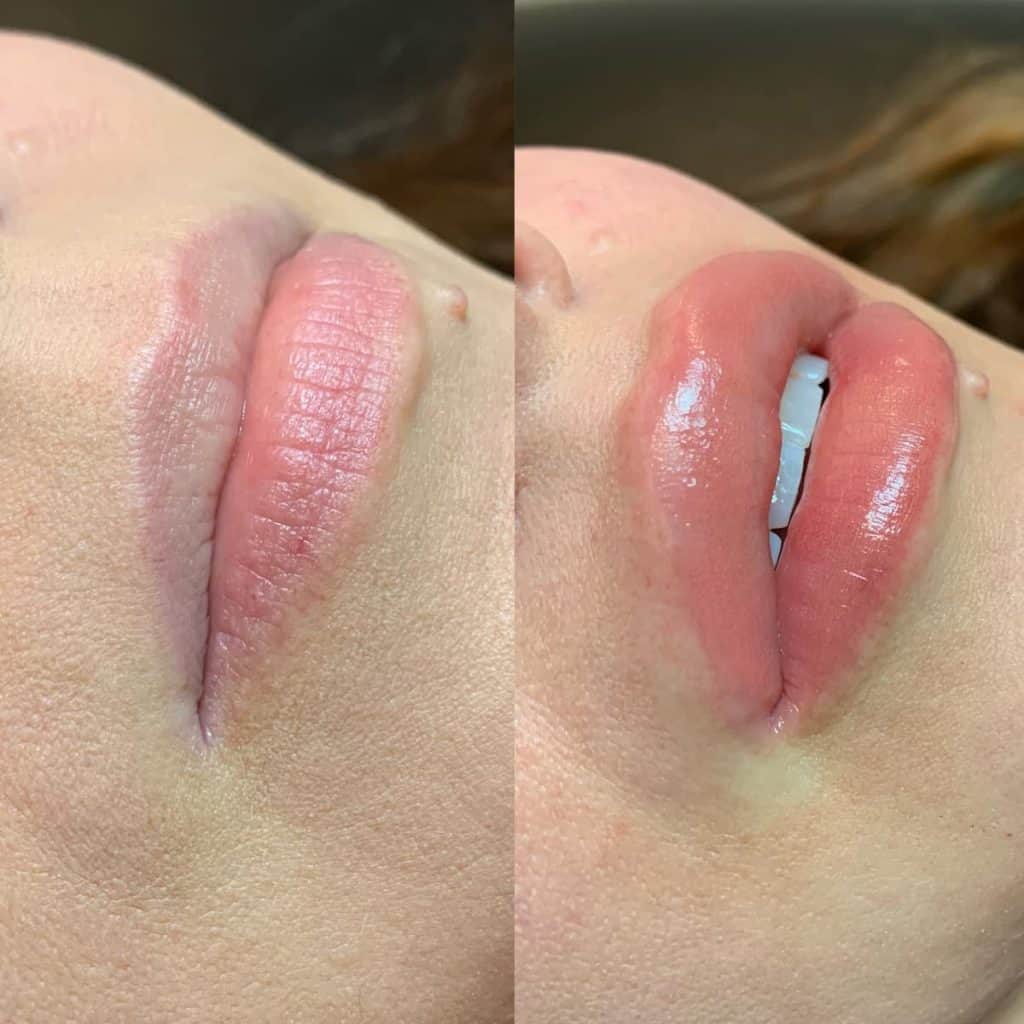
This is a before-and-after photo of a woman who has undergone lip blushing. As you can see, her lips look fuller and more alive after the lip micropigmentation healing process.
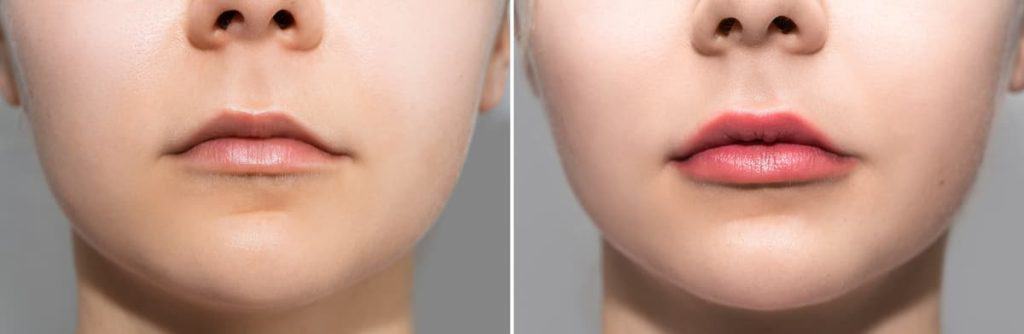
If you want to add pizzazz to your everyday look, lip blushing is still a great cosmetic procedure for you! Just look at this photo of the lip tattoo before and after healing.
Do’s and Don’ts During the Lip Blush Healing Process
DON’T: Work out
During the healing process, you should focus on treating your lips right. You don’t want to deal with extra sweat on your lips as it may slow down the healing process or cause infections.
DON’T: Touch your lips
Whether consciously or subconsciously, people touch their lips all the time. When you’ve undergone lip blushing, it’s best to avoid touching your lips for a while.
Our hands are carriers of a myriad of germs that can infect the lips and aggravate the healing process. Also, stop yourself from peeling flaky skin and scabs on your lips.
DO: Drink through a straw
This is especially crucial during the first few days of the healing process as you don’t want your lips to get wet. Water can make your lip wounds susceptible to infections, so you must avoid getting your lips wet as part of the lip color healing process.
DON’T: Do anything that could cause friction on your lips
These include activities like kissing, applying lipstick, or exfoliating your lips. It’s best to wait until your lips heal.
Frequently Asked Questions
Who Does Lip Blushing Procedures?
A makeup artist trained in the art of permanent makeup application usually does the lip blushing procedure.
To ensure you’re getting the procedure from a good artist, you need to find one with a license and ask the right question.
Before inquiring, try to gauge their previous works first. Yelp and Google are some of the best places to find reviews for an artist. Additionally, you can look at an artist’s social media page as their profile can act as their portfolio.
However, online profiles may not be enough since social media tends to be deceiving. Ask how long the artist has been doing this procedure and if they’re comfortable with it.
Also, make sure to inquire about how much their rates are to see if it meets your budget.
How Do I Prepare for a Lip Blushing Procedure?
It’s best practice to consult with your chosen artist before your scheduled appointment. You can choose a lip color during this time and settle on a design.
Right before the procedure, though, try to get a patch test in case you’re allergic to the inks and pigments. Also, if you have sores, it’s best to let those heal before the procedure.
How Much Does Lip Blushing Cost?
Lip blushing is an investment. It certainly is not cheap. The range is anywhere between $500 to $1,500, depending on the artist.
Taking Care of Your Lip Blush After the Procedure
There are two crucial points in the lip-blushing process. The lips tattoo healing process is just as necessary as the procedure if you want the best results.

Not only will it keep discomfort and any adverse effects on your lip health at bay, but it also ensures you get the color and effect you want.
While there are some sacrifices that you need to make during the lip blush healing process, these are well worth it to get the lip appearance you want. Luckily, these sacrifices are only short-term.
Ready to enhance your lips? Try out a lip tattoo procedure!
Want to Know More About Beauty?
- 13 Best Lipsticks For Older Women + How To Find The Best Ones
- A Complete Guide To The Microblading Healing Process
- 11 Ways To Remove Microblading: What’s The Best Treatment?

