How To Make Sugar Wax in the Microwave: A Step-by-Step Guide
This post may contain affiliate links, which means I may receive a small commission, at no cost to you, if you make a purchase.
Waxing is a popular hair removal method, but salon visits can be expensive and time-consuming.
Making sugar wax at home is a cost-effective and convenient alternative that allows you to achieve hair-free, smooth skin in the comfort of your own home.
While there are several methods for making sugar wax, using the microwave is one of the easiest and quickest ways to make it.

In this article, we provide a step-by-step process for making a sugar wax recipe in the microwave, including tips for achieving the right consistency and storing your sugar wax for future use.
Whether you’re new to waxing or a seasoned pro, making sugar wax in the microwave is a simple and effective solution for a DIY wax and achieving silky-smooth skin at home.
Table of Contents
- 1 What Is Sugar Wax?
- 2 Benefits of Sugar Waxing
- 3 Different Methods of Making Sugar Wax
- 4 5 Reasons To Make Sugar Wax in Microwave
- 5 How To Make Sugar Wax in the Microwave
- 6 How to Make Sugar Wax in The Microwave Without Lemon Juice?
- 7 How Long Do You Microwave Sugar Wax for Different Consistencies
- 8 Safety Precautions When Making Sugar Wax in the Microwave
- 9 Frequently Asked Questions
- 10 Make Sugar Wax in the Microwave from Now On!
- 11 Authors
What Is Sugar Wax?
Sugaring and waxing are both effective methods of removing unwanted hair.
While both are effective, sugar wax is a natural wax for hair removal made from simple ingredients such as sugar, lemon juice, and water.
It is a method of hair removal used for centuries in the Middle East and North Africa. It is gaining popularity worldwide as a natural and effective alternative to traditional waxing.
To make sugar wax, you heat the ingredients together to create a sticky paste that can be applied to the skin and removed in the opposite direction of hair growth, successfully pulling the hair out by the roots.
Unlike traditional waxing, sugar waxing does not require strips of cloth or paper to be placed on top of the wax before removing it.
Instead, you can apply the sugar wax directly to the skin and remove it without additional materials.
One of the benefits of sugar waxing is that the paste can be cleaned up easily with water since it is water-soluble. In contrast, traditional waxing requires oil or special wax removers to clean up any residual wax left on the skin.
Sugar waxing is also believed to be less painful than traditional waxing since it does not stick to the skin as much, though this may vary from person to person.
Watch this video that discusses sugar wax and how to apply sugar wax like a pro!
Benefits of Sugar Waxing
Now that you know what sugar wax is, you may wonder why using it for your depilatory needs is a good idea.
Sugar waxing has several benefits compared to other hair removal methods, including:
Natural Ingredients
Sugar wax is made from natural ingredients such as sugar, lemon juice, and water, making it a safe and chemical-free alternative to traditional waxing.
Gentle on The Skin
Sugar wax does not stick to the skin as much as traditional wax, reducing the risk of irritation or damage to the skin.
Effective Hair Removal
Sugar wax can effectively remove hair from the root, leaving the skin hair-free and smooth for several weeks.
Less Painful
Sugar waxing is generally less painful than traditional waxing since the paste does not stick to the skin as much and pulls the hair out more gently.
Easy Clean-Up
Since sugar wax is water-soluble, it can be easily removed with water, making it a convenient and mess-free option.
Long-Lasting Results
Sugar waxing can provide longer-lasting results than shaving or depilatory creams since it removes hair from the root.
If you want to learn everything about sugar waxing and how to do it properly, read our sugar wax beginner’s guide.
Different Methods of Making Sugar Wax
There are several different methods for making sugar wax. Here are three common ones:
Stovetop Method
The stovetop method of sugar wax is a traditional technique that involves heating a mixture of sugar, lemon juice, and water on the stovetop.
This method requires a saucepan and heat; the wax is typically stored in a heat-resistant glass jar or container.
Once the wax has cooled, it can be heated in a microwave-safe container until it reaches a spreadable consistency and then used as a hair removal cream.
The stovetop method of sugar wax is a popular option for those who want to make large batches of this wax or prefer the traditional preparation method.
Cold Method
The cold method way of making sugar wax is a technique for making sugar wax that doesn’t require heat.
It involves combining sugar, lemon juice, and water, then letting the mixture cool and harden before using it to remove hair.

The resulting wax has a texture similar to taffy or caramel and can be applied to the skin using a spatula or applicator.
The cold method is a good option for people who don’t have ready access to a stove or microwave or for those who prefer not to use heat when making wax.
However, keep in mind that this usually takes longer than other methods.
Microwave Method
Now you’re probably wondering — can you make sugar wax in the microwave?
Absolutely! And it’s really easy too!
The microwave method of sugar wax is a fast and hassle-free technique for making sugar wax that involves using a microwave to heat and melt the sugar, lemon juice, and water mixture.
This method requires a microwave-safe bowl or container. And similar to the stovetop method, microwaved sugar wax is stored in a heat-resistant glass container or jar after it’s done.
The microwave method of sugar wax is a quick and easy option for those who want to make small batches of wax and prefer the convenience of using a microwave since the wax needs time to properly cool and solidify before you can use it.
In this article, we will focus on making sugar wax in the microwave and why this is an easy method you can use every day.
5 Reasons To Make Sugar Wax in Microwave
Now that you know why you should use sugar wax and the different methods of making it at home, we’ll take a closer look at why you should use the microwave method if you want something easy and effective.
Here are five reasons why you should know how to make sugar wax in the microwave:
Quick and Easy
Making sugar wax in the microwave can be quick and easy, as it only takes a few minutes to heat the ingredients and prepare the wax.
Minimal Equipment Needed
Making sugar wax in the microwave requires minimal equipment, as you only need a microwave, a microwave-safe bowl, and a stirring spoon.
Small Batches
If you only need a small amount of wax for hair removal, making sugar wax in the microwave can be a convenient way to prepare just enough for your needs.
Controlled Heating
When making sugar wax on the stovetop, controlling the temperature and preventing the wax from burning can be challenging.
Making sugar wax in the microwave allows for more precise temperature control, resulting in smoother and more consistent wax.
Easy To Clean
Since the ingredients for sugar wax are water-soluble, any spills or splatters can be easily cleaned up with water, making it a mess-free process.
How To Make Sugar Wax in the Microwave
Now that you know the many benefits of making sugar wax in the microwave, you may want to know how to make it in the comfort of your home.
Here’s an easy DIY microwave sugar wax recipe:
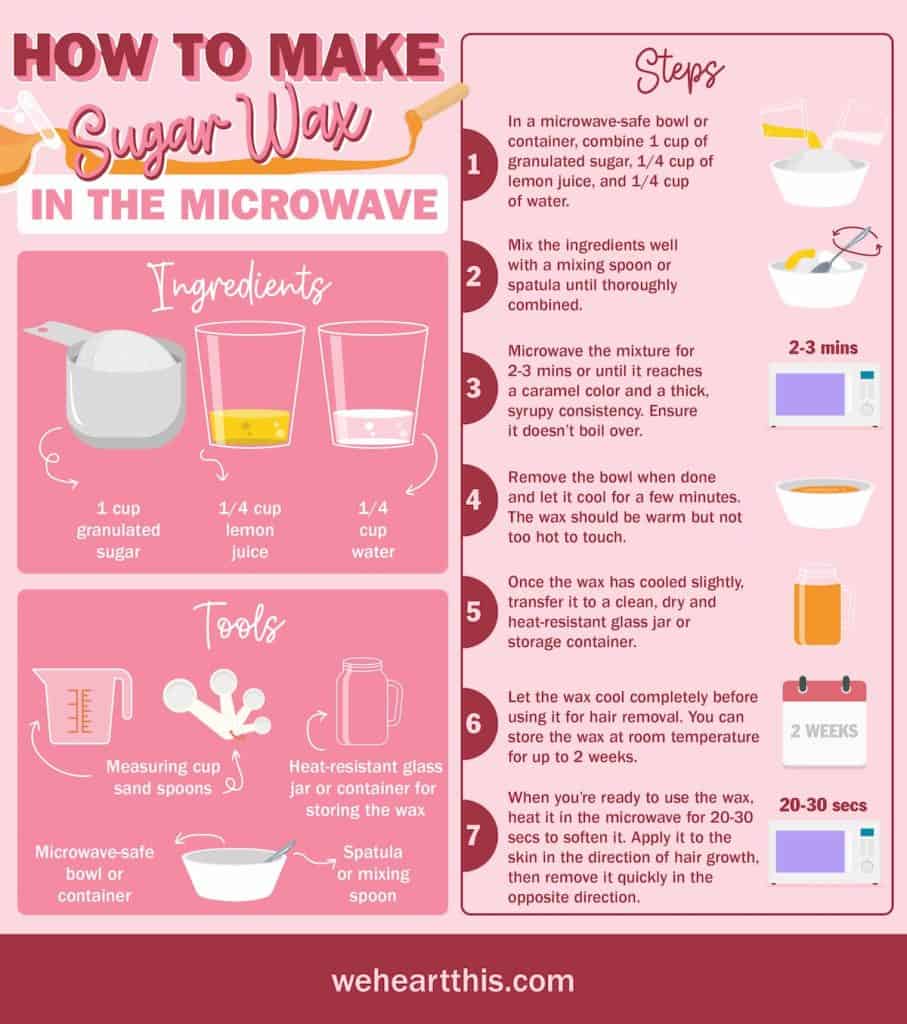
Ingredients
- 1 cup granulated sugar
- 1/4 cup lemon juice
- 1/4 cup water
Tools
- Microwave-safe bowl or container
- Spatula or mixing spoon
- Heat-resistant glass jar or container for storing the wax
- Measuring cups and spoons
Steps
- In a microwave-safe bowl or container, combine 1 cup of granulated sugar, 1/4 cup of lemon juice, and 1/4 cup of water.
- Mix the ingredients well with a mixing spoon or spatula until thoroughly combined.
- Microwave the mixture for two to three minutes or until it reaches a caramel color and a thick, syrupy consistency. Keep an eye on the mixture to ensure it doesn’t boil over.
- Remove the bowl when done and let it cool for a few minutes. The wax should be warm but not too hot to touch.
- Once the wax has cooled slightly, transfer it to a heat-resistant glass jar or storage container. Make sure the container is clean and dry before adding the wax.
- Let the wax cool completely before using it for hair removal. You can store the wax at room temperature for up to 2 weeks.
- When you’re ready to use the wax, heat it in the microwave for 20-30 seconds to soften it. Apply it to the skin in the direction of hair growth, then remove it quickly in the opposite direction.
By following these steps, you can make a microwave sugar wax that’s easy to use and effective for hair removal.
Want more instructions? Here’s a detailed video that explains how to perfect making sugar wax in the microwave:
How to Make Sugar Wax in The Microwave Without Lemon Juice?
Sugar wax can also be made without lemon juice.
If you don’t have lemon juice or prefer not to use it in your sugar wax recipe, you can still make sugar wax in the microwave using a different acid or without any acid at all.
The preparation procedure is similar to the microwaved sugar wax recipe but without lemon juice. (spoiler alert!)
You can still create a sugar wax that’s effective for hair removal by using vinegar instead of lemon juice.
Note: The scent of the vinegar may be more noticeable than lemon juice, so you may want to test the wax on a small area of skin before using it on a larger area
Here’s how to make sugar wax in the microwave without lemon juice:
Ingredients
- 1 cup granulated sugar
- 1/4 cup water
- 1 tablespoon vinegar (white or apple cider)
Steps
- In a microwavable bowl, pour ¼ cup of water, 1 cup of granulated sugar, and 1 tablespoon of vinegar (apple cider or white vinegar).
- Mix the ingredients well with a mixing spoon or spatula until thoroughly combined.
- Put the mixture in the microwave and wait for about 2 to 3 minutes or until it has a syrupy, thick consistency and a caramel color.
- Do not let the mixture overboil to avoid burning it.
- Remove the bowl when done and let it cool for a few minutes.
- Transfer the sugar wax to a heat-resistant container or glass jar when it is slightly cooled.
- Allow the wax to be completely cool before using it for hair removal to avoid burning your skin.
Check out this article for more alternatives to making sugar wax without lemon.
How Long Do You Microwave Sugar Wax for Different Consistencies
Did you know you can achieve different sugar wax consistencies and variations when making sugar wax in a microwave?
It’s true. A slight change in sugar wax temperature can make it soft, hard, or even rubber wax.
You can do so with the same procedure but with different temperatures and timing.
Soft Sugar Wax
If you want to make a soft sugar wax, cook the mixture of the ingredients in the microwave for one minute.
To use the soft wax, get a wax spatula to spread it on the skin. Then, use a muslin cloth over it and remove it quickly in the opposite direction to remove it along the hair.
Hard Sugar Wax
You can achieve a hard sugar wax with the same process if you wait for the mixture to cook for three minutes in the microwave.
If you plan to use hard wax, use it on your skin with a wax spatula or your fingers. Also, you do not need to use a muslin cloth waxing strip to remove the wax.
To remove hairs, all you need to do is to pull the wax in the opposite direction with your hands.
Hard sugar wax is usually better for sensitive skin or if you don’t like too much heat on your skin while waxing.
Rubber Sugar Wax
Cooking the sugar wax mixture for six to eight minutes will help you get a thick, rubber-like texture once it cools.

Like the hard sugar wax, you can apply the rubber sugar wax on the skin with your fingers and remove unwanted hairs by pulling it in the opposite direction.
Also, you don’t need a cloth or spatula to use sugar wax with this consistency.
Safety Precautions When Making Sugar Wax in the Microwave
When making sugar wax in the microwave, following safety precautions to prevent accidents and injuries is crucial.
Here are some safety precautions to keep in mind:
- Use a microwave-safe bowl when to prevent it from cracking or exploding in the microwave.
- When stirring the sugar wax, use a long-handled spoon or spatula to prevent hot wax from splashing onto your skin.
- Use heat-resistant gloves when working with hot sugar wax to protect your hands from burns.
- Before applying the wax to your skin, test the temperature on a small area to ensure it’s not too hot.
- Use caution when removing the wax.
- When pulling the wax strip off your skin, do it quickly and in the opposite direction of hair growth to minimize pain and discomfort.
- If you spill hot sugar wax, clean it up immediately to prevent it from hardening and causing a hazard.
- In case of burns or accidents, keep a bowl of cool water nearby to cool down the affected area immediately.
These safety precautions can minimize the risk of accidents and injuries when making sugar wax in the microwave.
Frequently Asked Questions
How to store DIY homemade sugar wax?
Storing sugar wax at home is relatively easy. Here are some steps to help you keep sugar wax properly and use it whenever necessary.
Allow the wax to cool down completely before storing it. This will prevent moisture from building up in the container.
Once cooled, transfer the sugar wax to an airtight container, such as a glass jar or plastic container with a tight-fitting lid. This will help keep out dust and other contaminants.
Scoop the wax into the container using a spatula or spoon. Be sure to leave some space at the top of the container, as the wax may expand slightly as it cools.
Lastly, store the container in a cool, dry place away from direct sunlight to help the wax maintain consistency and prevent it from melting.
When you’re ready to use the wax again, heat it in the microwave or stovetop until it becomes soft and pliable.
Pro Tip: Do not store sugar wax in the refrigerator, as this can cause it to harden and become difficult to use.
What is the easiest way to make at-home sugar wax?
The easiest way to make sugar wax at home is using the microwave method. This method involves melting the sugar mixture in the microwave and is less time-consuming and easier to clean up than the stovetop method.
Plus, it’s an excellent option for those new to waxing or looking for a quick and easy way to remove unwanted hair at home.
Which lasts longer, waxing or sugaring?
Waxing and sugaring are hair removal methods meant to adhere to the hair rather than the skin, leading to a longer-lasting effect when hair follicles are properly removed.
However, the effectiveness and longevity of both hair removal methods depend on various factors, including hair type, hair growth cycle, and individual skin type.
Some people may find that waxing lasts longer for them, while others may prefer sugaring.
Ultimately, it’s up to personal preference and trial and error to determine which hair removal method works best for you and gives you the long-lasting results you want.
Make Sugar Wax in the Microwave from Now On!
Making sugar wax in the microwave is a simple and cost-effective method for at-home sugaring ad achieving smooth, hair-free skin at home.
Following our recipe and guidelines, you can create a batch of sugar wax perfect for removing unwanted hair from your face, legs, underarms, or bikini area.

With some practice, you can perfect your technique and achieve salon-worthy results from the comfort of your home.
So, try it and see for yourself just how easy and effective making sugar wax in the microwave can be.
Once you get the hang of it, you may never need to go to the waxing salon again.
Want to read more DIY beauty tips? Check out these articles:
- 7 Best DIY Cuticle Removers To Try At Home
- DIY Dry Shampoo Recipes + Hacks You Should Try
- 16 Hairspray Alternatives: Store-Bought And DIY