What Is a Nail Fill for Acrylic Nails?
This post may contain affiliate links, which means I may receive a small commission, at no cost to you, if you make a purchase.
Acrylic nails are a godsend for anyone who can’t grow naturally long nails without breaking them.
So if you want to give your nails a dramatic makeover, acrylics are perfect for you!
These artificial nail enhancements give you lengthy, attention-grabbing nails that last for weeks. Even better, they also allow you to get creative with different nail designs and accessories!
Of course, as good as they are, they can’t last forever.
But that doesn’t mean you have to get a whole new set of acrylics every few weeks — all you need is an acrylic nail fill!
But what is a nail fill for acrylics? Why do you need it? Can you do it on your own at home?
We’ll answer all these questions and more in this article.
Table of Contents
- 1 What Is a Nail Fill for Acrylic Nails?
- 2 How Often Do You Need Fill-Ins for Acrylic Nails?
- 3 Why You Need Acrylic Fill-Ins
- 4 How To Do Acrylic Nail Infills: Step-by-Step Guide
- 5 When To Get a Full Set of Acrylic Nails Instead of an Acrylic Fill
- 6 FAQs
- 7 What Is an Acrylic Nail Fill? A Lifesaver for Acrylic Nail Enthusiasts!
- 8 Authors
What Is a Nail Fill for Acrylic Nails?
Also called an acrylic fill, fill-in, refill, or infill, a nail fill is a crucial part of acrylic nail upkeep.
It uses new acrylic to fill in the gap that develops between the cuticle and the bottom edge of the acrylic nail.
Why does this gap occur in the first place? Simple: it’s because your nails are constantly growing.
Remember that nail growth begins at the nail matrix, which is found under the cuticle.
So the formation and growth of new cells at the base of the nail push out your acrylics and make them move forward, creating a noticeable gap between your natural and artificial nails.
An acrylic nail fill is designed to provide a quick and inexpensive fix for this issue by filling in the area of regrowth, making your nails look freshly done.
How Often Do You Need Fill-Ins for Acrylic Nails?
A set of acrylic nails typically lasts around 6 to 8 weeks. You’ll need to get your nails filled in every 2 to 3 weeks within that period.
Take note that some people may need more frequent refills if their nails grow at a faster rate. If you’re one of them, ask your nail technician to help you establish the right refill schedule for your needs.
Also, remember that it’s best to schedule an infill appointment as soon you notice your acrylic nails moving away from your cuticle, as this is a telltale sign that your acrylic nails need a fill.
Why You Need Acrylic Fill-Ins
Now that you know the answer to the question, “What is a nail fill for acrylics?” you may be wondering why you need one in the first place.
Let’s take a closer look at why acrylic nail fills are necessary.
Aesthetic
It goes without saying that visibly overgrown nails under your acrylics — even if you have a gorgeous set with intricate designs — can look unkempt and unsightly.
So how do you preserve the flawless appearance of your manicure? Get regular acrylic nail fills!
Health
If you go too long between refills, the growth of your natural nails may cause your acrylic nails to lift. And lifted acrylics can also pose a major health hazard.
Why? This is because the space between your acrylic and natural nails can trap dirt, moisture, and bacteria.
This can create the optimal environment for the growth of fungi, which can then lead to a fungal nail infection with symptoms like the following:
- Nail discoloration
- Foul odor from the nails
- Itching and redness
- Pain and swelling
Once you develop an infection, you’ll have to remove all your acrylics completely to get proper treatment.
The good news is sticking to your infill schedule will help you avoid nail health issues like this.
Function
Acrylic nails can be a bit high-maintenance. In fact, doing daily tasks is typically harder with acrylics.
Now imagine when they start to lift.
Lifted acrylic nails will make it even harder for you to do chores, type on your phone or laptop, and perform various daily activities. Your hair and clothes may snag frequently on the lifted edges as well.
To stop nail lifting before it starts, get your nails filled in regularly.
Pro tip: If your nails have already lifted after going too long between refills, wrap them with bandages right away. Doing this will keep them from breaking off before you head to the salon to have your nail tech fix the issue.
Cost
An acrylic nail fill vs. a full set of acrylic nails: which is cheaper?
Well, both procedures have a similar price range of around $20 to $80. But it does depend on where you live.
However, if you get the former, you’ll have to pay your nail tech to remove your existing set. This means you’ll have to shell out another $10 to $30 or so for removal.
Sometimes, a new set of acrylics with a complex design may even set you back up to $120.
All in all, a refill is generally cheaper than a full set of new acrylics.
How To Do Acrylic Nail Infills: Step-by-Step Guide
Don’t want to spend on frequent nail appointments? You’ll be happy to know that you can do your own infill at home with the right tools and guidelines!
Follow these steps for a successful DIY nail fill for acrylics.
Gather Your Tools
Here are some of the tools you’ll need:
- Nail buffer
- Nail primer
- Nail dehydrator
- Nail drill
- Pliers
- Cuticle pusher
- Powder polymer
- Liquid monomer
- Dish
- Brush
- Non-acetone-based nail polish remover
Remove the Old Nail Polish
For this step, use a non-acetone-based polish remover to make sure that only the paint comes off and not the acrylic.
This is because acetone can break down the glue and acrylic, making your acrylic nails come off.
If your current set of acrylic nails also has gems or charms, remove these with a small pair of pliers.
Clean Your Nails
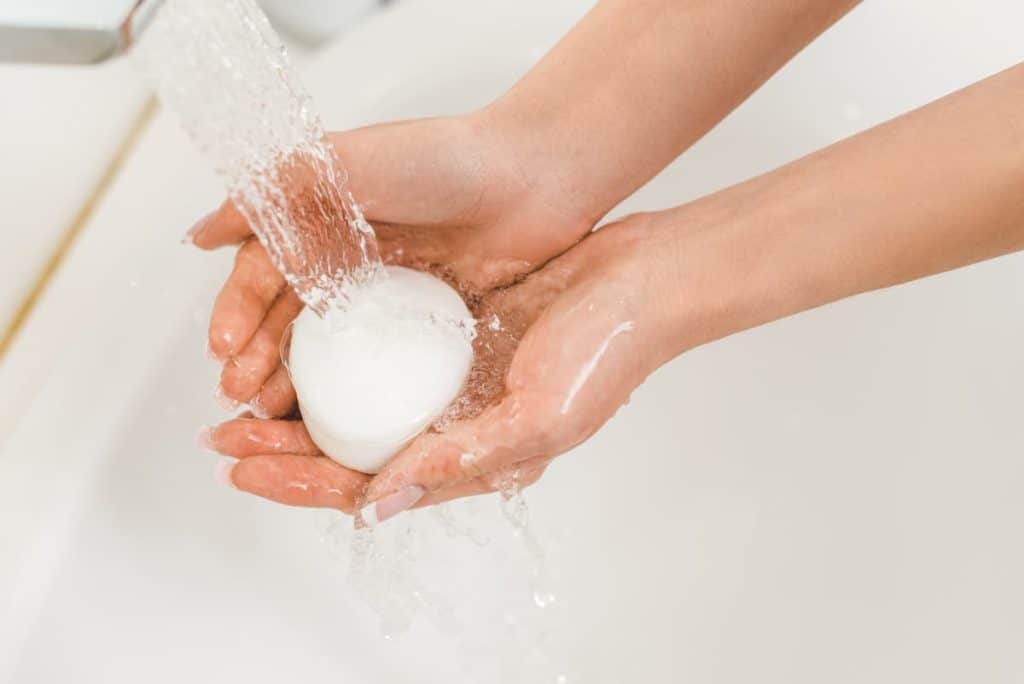
Clean your hands and nails with alcohol or nail cleanser and lint-free wipes or wash them with mild soap and water. Doing this will help prevent dirt and bacteria on your nail bed from getting trapped under the new acrylic you’re about to apply.
Gently Push Your Cuticles
Use a cuticle pusher or orange stick to gently push away any excess cuticle and remove dry and dead skin.
Then wipe your hands clean again.
Buff the Acrylics
Buff the lifted edge of the acrylic with a rough nail buffer or nail drill. Then gently buff the natural nail to remove its shine and help with acrylic fill adhesion.
Keep buffing until you create a smooth surface between the edge of the acrylic and your natural nail. Ensure there are no pockets before you proceed with the next step.
Then wipe any leftover dust from buffing away.
Apply a Nail Dehydrator and Primer
Apply a nail dehydrator to your nail plate to eliminate excess oil and ensure a smooth base for the application of the acrylic.
Then apply a nail primer carefully to the gap between the edge of the acrylic and your natural nail. This product will protect your nails from the damaging effects of the acrylic.
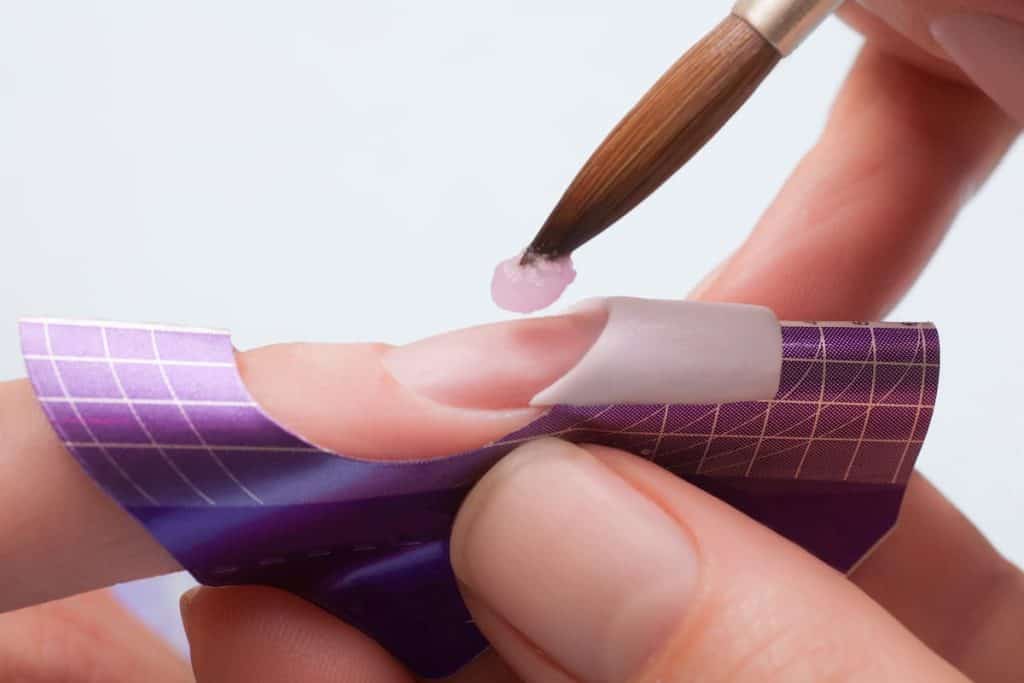
Fill the Gaps With Acrylic
Dip your acrylic brush into your monomer, then dab the brush into the acrylic powder until you pick up the appropriate-sized bead.
Using your acrylic brush, apply each bead to each nail and smoothen it out, gently and carefully filling the gap.
Apply Acrylic Mixture Over Your Nails
Once the gap is completely filled, gently brush a small amount of liquid monomer and acrylic powder over the entire nail.
Pat this smooth with your brush, and let it dry.
File, Buff, and Paint Your Nails
File and buff your nails as desired, until you get the shape and length that you want.
Finally, apply a fresh coat of nail polish to your acrylic nails. Start with a base coat, follow it up with your choice of colored nail polish, and finish with a top coat.
Want to see the acrylic nail fill process in action? Check out this beginner-friendly tutorial video:
When To Get a Full Set of Acrylic Nails Instead of an Acrylic Fill
Once your acrylic nails turn six to eight weeks old, do you get an acrylic nail refill or a new set of nails?
Well, at this point, the adhesive used to bond your acrylics to your natural nails will have weakened and broken down significantly.
This means acrylic fills will no longer be enough to extend their life span, and they’ll need to be removed completely and replaced with a new set.
There are also other instances where you should get new acrylics instead of acrylic fills. Here are examples:
- Excessive lifting
- Severe acrylic nail damage
- Visible signs of infection
FAQs
How Long Does an Acrylic Nail Fill Take?
Getting fill-ins for acrylic nails should be quicker than getting a new set. It can take anywhere from 25 minutes to an hour, depending on the length, shape, and thickness of your acrylics.
This also depends on whether you go to a salon or a private nail tech. Salons tend to do a quicker job because they have several clients coming in, while private nail techs get to choose how many clients they book so they can take their time and pay attention to detail.
Does an Acrylic Fill Damage Your Nails?
With the right nail technician, doing an acrylic fill shouldn’t pose as serious a risk for nail damage.
That said, getting touch-ups or acrylic fills a little too frequently can weaken or damage your nails.
As such, it’s best to stick to your refill schedule, and if your nails feel damaged, brittle, or weak, give your nails a break from acrylics every few months.
Can You Change Your Nail Color and Design When Getting an Acrylic Fill?
This will depend on the existing design. If the current design has complex 3D decor or colorful nail art that you want removed or covered up, it may be better to get a new full set. Complicated designs may still be visible under a new layer of acrylic.
It will also be difficult to cover up acrylic nails in dark colors if you want lighter colors. Applying multiple layers of acrylic without removing the existing layer can lead to thicker and potentially less durable nails. Over time, this may affect the overall health of your nails.
If the existing design can be easily covered up (ideally with a darker, more opaque color), then the process involves covering up your current color with a new base color and designs.
Always ask your nail technician.
What Is an Acrylic Nail Fill? A Lifesaver for Acrylic Nail Enthusiasts!
Getting acrylic nails requires a lot of upkeep, a huge part of which is scheduling frequent infill appointments.
But as our discussion above shows, acrylic nail fills are incredibly important! They help keep your nails looking flawless, prevent health risks, and allow you to avoid splurging on a new set of acrylic nails every few weeks.

So make sure to hit the salon regularly to get your nails filled in or get the job done yourself by following the steps listed above.
This way, you can flaunt your gorgeous acrylics for longer!
Love Nails?
Check out these articles:
- 11 Best Nail Polishes for Stamping: A Complete Buyer’s Guide
- 50 Colored French Tip Nails To Try
- 17 Gorgeous Nude Nail Designs To Try